29 Jul 2026
How to Send Bulk Outreach Emails Through Gmail
Sending outreach emails manually can be time-consuming, especially when contacting multiple prospects, influencers, or business partners. This guide explains how to create a bulk email outreach system using Gmail.
Guide
Goal:
To set up a system that allows you to send bulk outreach emails directly from your Gmail account.
Ideal Outcome:
You can easily send customised emails to multiple recipients without having to create each message manually, while still maintaining a personalised and natural tone.
Prerequisites or Requirements:
You need a Gmail account. If you do not already have one, you can create one easily. You will also need to gather relevant information about the contacts you plan to include in your bulk outreach campaigns.
Why This Is Important:
Outreach emails are a critical component of digital marketing efforts. However, sending them manually can be time-consuming and inefficient, especially when trying to personalise messages. Sending the same email to dozens of recipients at once, where everyone can see the full recipient list, is neither professional nor effective. A proper bulk email system solves this problem.
Where This Is Done:|
In your web browser, specifically within Gmail and Google Sheets.
When This Is Done:
Whenever you need to send the same or a similar email to multiple recipients.
Who Does This:
You, your Virtual Assistant (VA), your SEO specialist, or a digital marketing agency you have engaged.
Environment Setup
If you do not already have a Gmail account, create one at the official Gmail sign-up page.
You will also need to install Yet Another Mail Merge, following the steps outlined later in this SOP. This Google Sheets add-on allows you to merge contact data from a spreadsheet with Gmail, enabling bulk email sending.
Create a Database With Your Contacts’ Information
Before sending bulk emails, you must create a database containing your contacts’ details. While this step may take some time, it is straightforward.
Follow these steps:
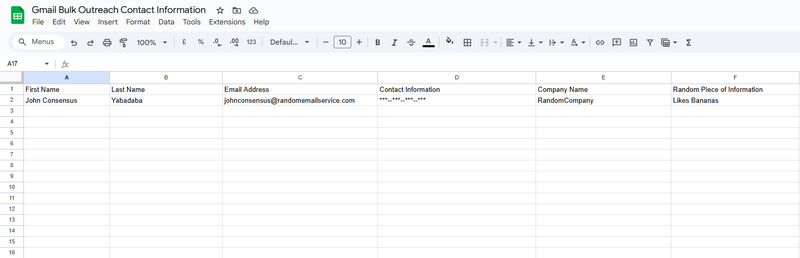
- Create a new Google Sheet.
- Name the sheet something descriptive, such as “Gmail Bulk Outreach Contacts Information.”
If you create multiple sheets, add distinguishing details (e.g. “Gmail Bulk Outreach Contacts Information – Influencer Outreach”). - Create columns for the information you have about each contact, such as:
- First name
- Last name
- Email address
- Phone number
- Company name
4. Enter the information, ensuring one contact per row.
Enable “Templates” in Gmail
Templates allow you to reuse email drafts without copying and pasting text.
To enable templates in Gmail (this only needs to be done once):
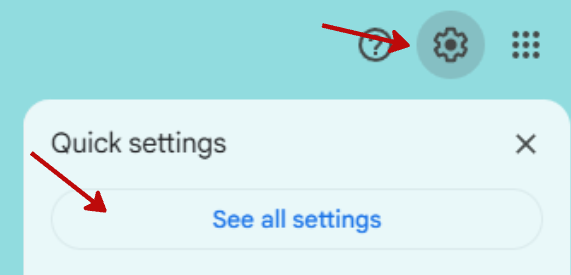
- Open Gmail.
- Click the gear icon → Settings → See all settings.
3. Click the “Advanced” tab.

4. Locate “Templates” and select “Enable.”

5. Click “Save changes.”
Install Yet Another Mail Merge
To send bulk emails, install the Yet Another Mail Merge (YAMM) add-on:
- Open the Google Sheet containing your contacts.
- Go to Extensions → Add-ons → Get add-ons.
- Search for “Yet Another Mail Merge.”
- Install the add-on and grant the required permissions.
Create an Email Template
Before sending bulk emails, you must create an email template:
- Open Gmail and click Compose.
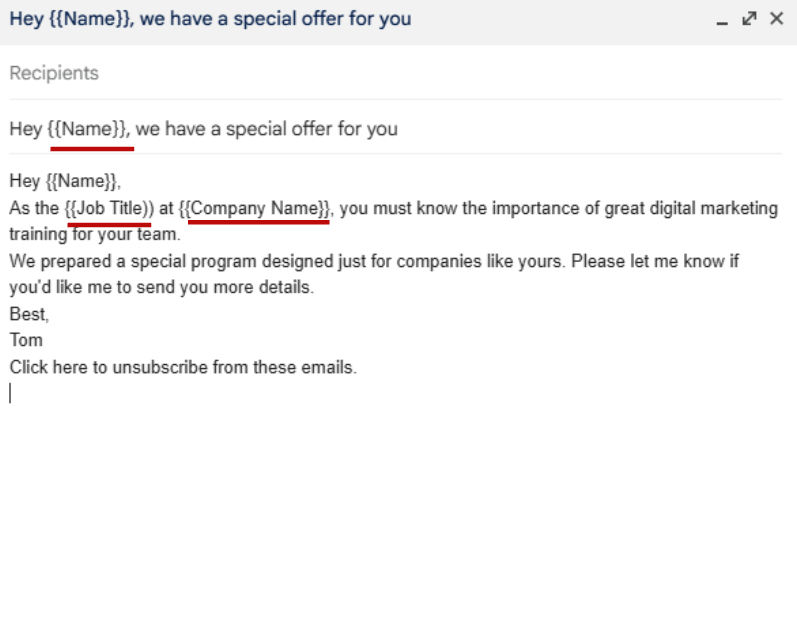
- Write your email, including the subject line.
- Use double curly brackets ({{ }}) to insert merge fields that match your spreadsheet column headers.
Example: {{First Name}}
Important: Merge fields must exactly match the column names, including capitalisation.
Add an Unsubscribe Link (Recommended)
It is best practice to include an unsubscribe option to avoid spam complaints.
To do this:
- Add a line such as “Click here to unsubscribe from these emails.”
- Hyperlink it to: https://app.yamm.com/unsubscribe
Save the Email as a Template
- In the compose window, click the arrow next to the Delete icon.
- Go to Templates → Save draft as template → Save as new template.
- Enter a name for the template and click Save.
Send Your Bulk Email
- Open your Google Sheet contact database.
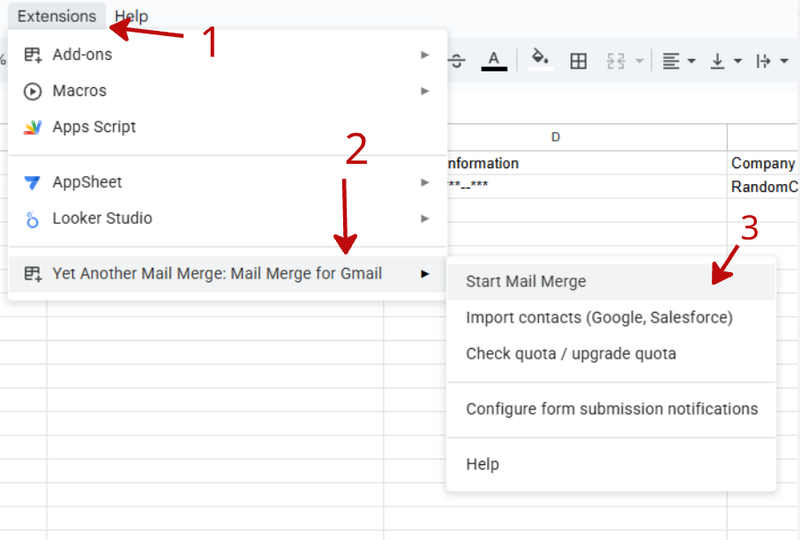
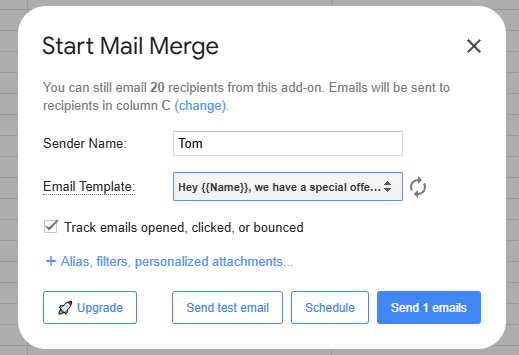
- Click Extensions → Yet Another Mail Merge → Start Mail Merge.
- Click Continue (the free version allows up to 50 emails per day).
4. Enter or customise the sender name.
5. Select the email template you created.
6. Tick “Track emails opened, clicked or bounced.”
7. Send a test email to ensure all merge fields display correctly.
Once everything is verified, click Send.
Review Tracking Results
After sending, a tracking panel will appear on the right-hand side showing:
- Emails opened
- Links clicked
- Replies
- Bounces
- Unsubscribes
Each recipient’s status will also update in the “Merge status” column in your spreadsheet.
That’s it. You now have a reliable, repeatable system for sending personalised bulk outreach emails using nothing more than Gmail and Google Sheets.