
Goal: Have all your conversions set up and send the conversion data to the Meta Ads platform.
Ideal Outcome: Conversions are properly configured, allowing you to use them within your Meta ad campaigns for optimisation and reporting.
Prerequisites or requirements:
To follow this SOP and add Standard Events, you must have:
- Google Tag Manager installed on your website.
- A Meta Business Manager account set up for your business.
- The Meta (Facebook) Pixel installed on your website.
- Your domain verified inside Meta Business Manager.
Why this is important:
Once this SOP is completed, you will be able to:
- Measure how many conversions each advertisement generates.
- Attribute revenue to specific campaigns.
- Optimise campaigns based on performance data.
- Improve return on ad spend across the account.
Where this is done:
- Google Tag Manager
- Meta Business Manager
- Meta Ads platform
When this is done:
- Each time a new conversion action needs to be measured.
- When launching new campaigns that require updated tracking.
Who does this:
- IT manager
- Analytics specialist
- PPC specialist
- Digital marketing manager
Environment Setup
Important: On 27 April 2021, Facebook introduced updated ad measurement protocols in response to Apple’s iOS14 App Tracking Transparency (ATT) requirements.These changes limit data collection and sharing unless Apple users opt in to tracking.
As a result:
- Tracking accuracy may decrease.
- Remarketing audience sizes may reduce.
- Conversion reporting may become partially modelled rather than fully deterministic.
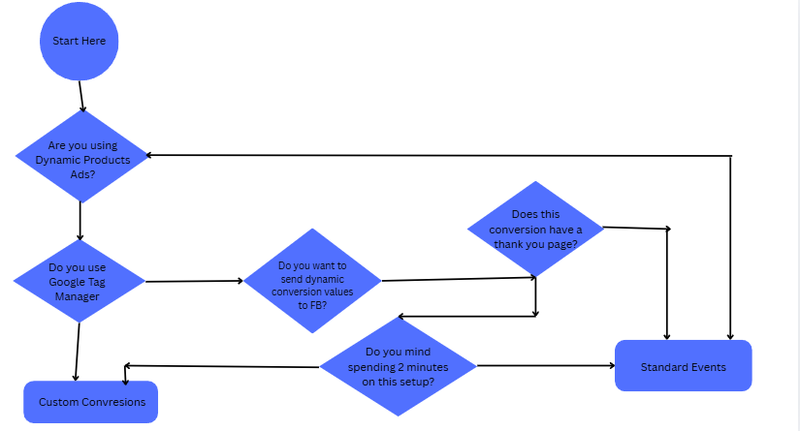
Deciding which conversion tracking method is appropriate
If you are already familiar with Meta conversion tracking and have a preferred method, you may proceed directly to that section. In some cases, the choice between Standard Events and Custom Conversions is based on technical capability or internal preference.
For the purpose of this SOP, a structured decision framework was created to simplify the process.
Connect Meta Pixel to your website in Meta Business Manager
Open Meta Business Manager in your browser:
https://business.facebook.com
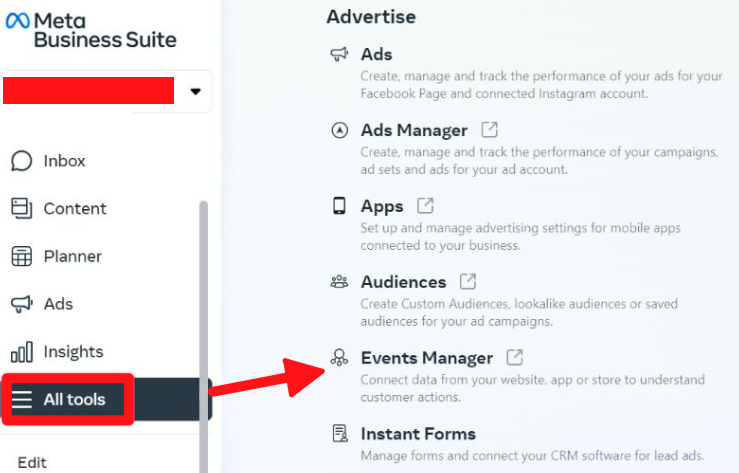
On the sidebar:
- Click “All tools”
- Select “Events Manager”
In Events Manager:
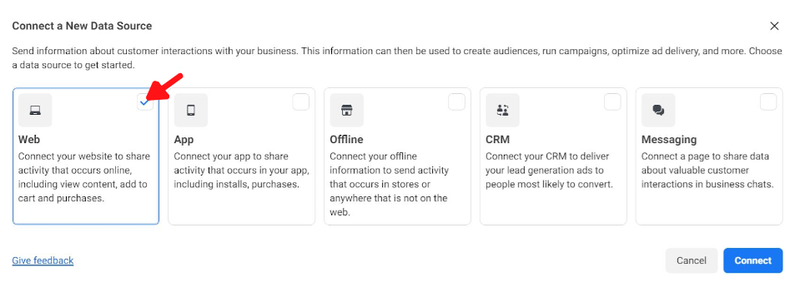
- Click “+ Connect Data Sources”

- Select “Web”
- Click “Connect”
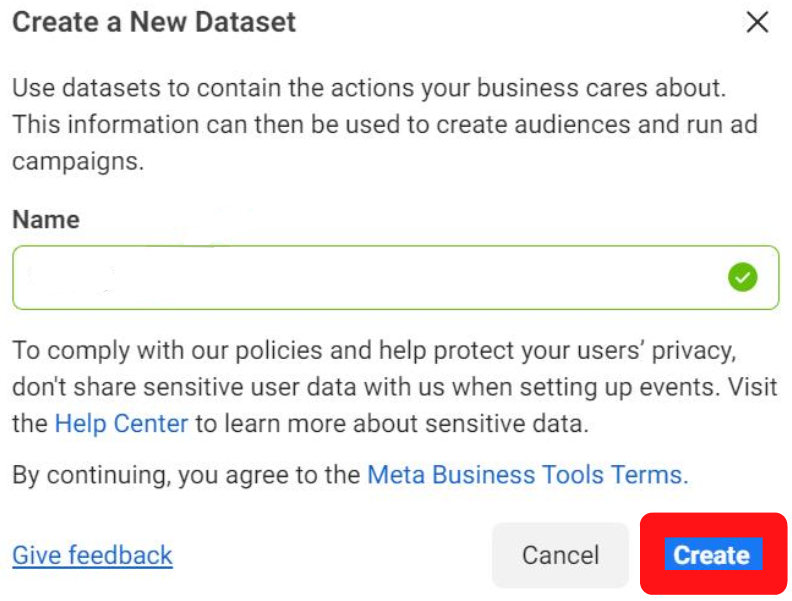
Name your new data source and click “Create”.
Enter your website URL. Untick partner integration so you can manually install the Pixel code (recommended). Manual implementation allows better compatibility with the Conversions API and provides greater control over tracking accuracy.
Click “Next”.
Select:
- “Meta Pixel and Conversions API”
- Click “Next”
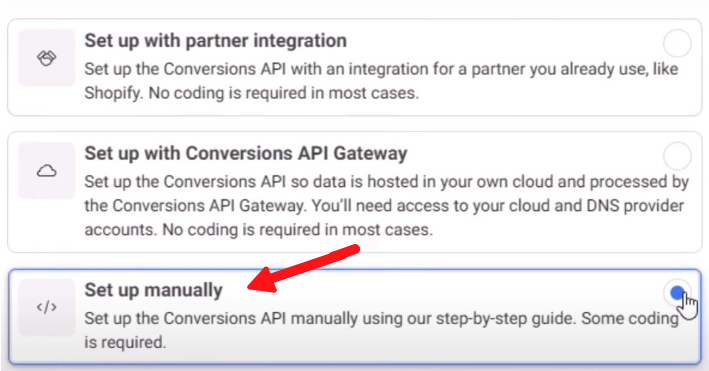
Click “Set up manually”, then click “Next”.
Under “Manual Implementation Overview”, click “Continue”.
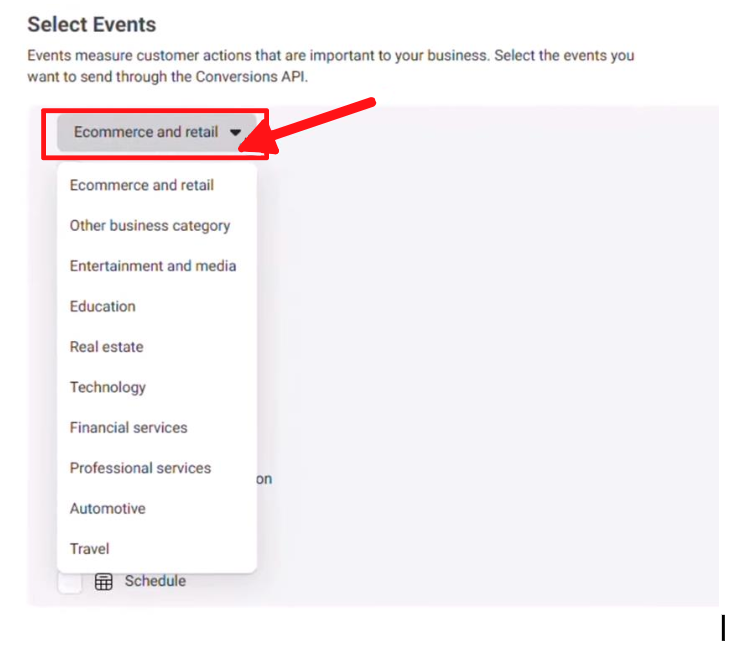
Under “Select Events”:
- Choose the industry most relevant to your business from the drop-down menu.
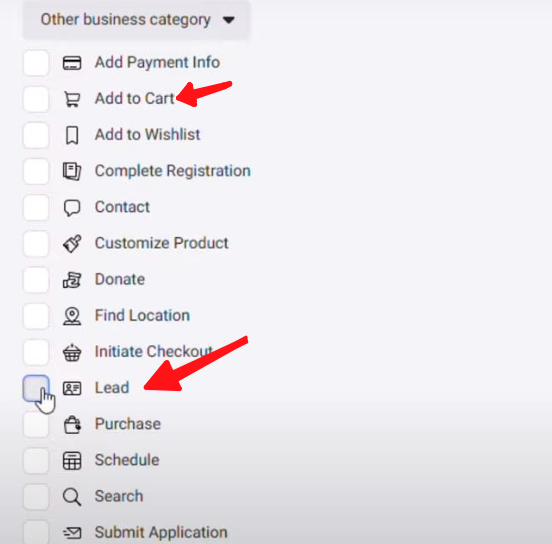
Select the event you wish to track, such as:
- Leads
- Purchase
- Add to Cart
- View Content
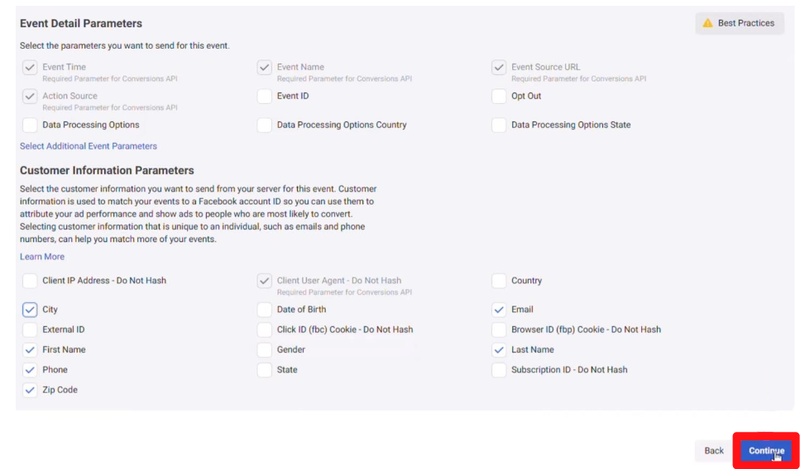
Before clicking “Continue”, select the relevant event parameters you wish to track.
Click “Install code manually”.
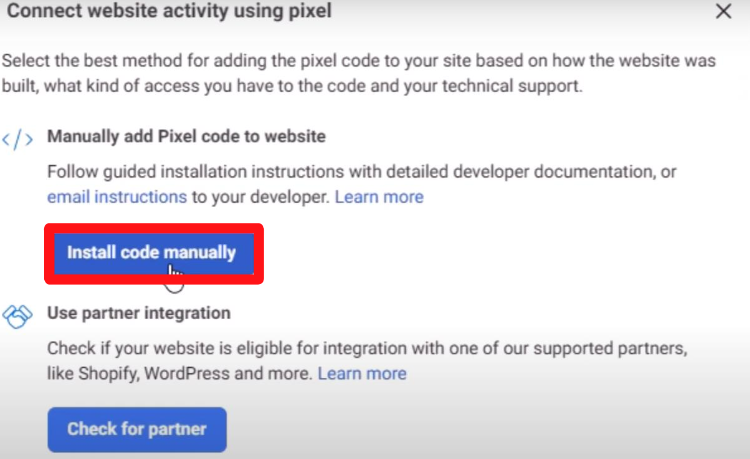
Copy the base code and paste it into your website before the closing tag.
Once complete, proceed to the section titled “Check if conversions are being tracked properly”.
Setting up conversion tracking using Standard Events in Meta Business Manager
Open Meta Business Manager:
https://business.facebook.com
In the sidebar:
- Click “All tools”
- Select “Events Manager”
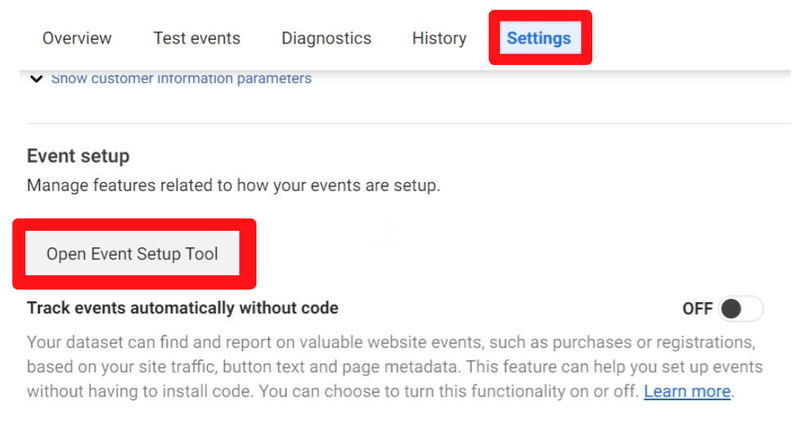
In the Events Manager sidebar:
- Select “Data Sources”
- Click “Settings”
- Scroll down and click “Open Event Setup Tool”
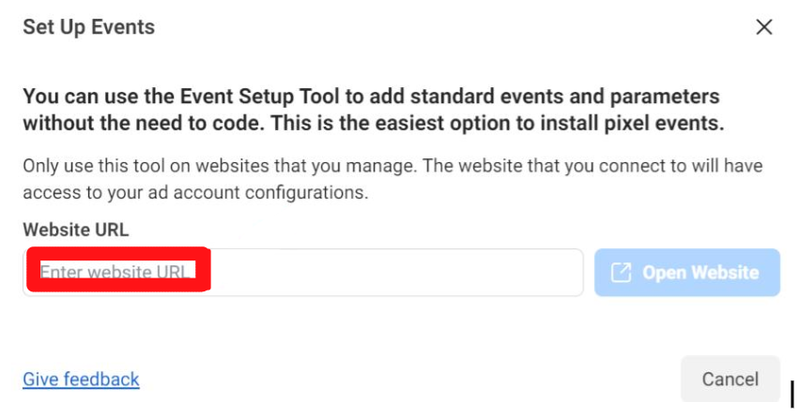
Enter your website URL and click “Open Website”.
On your website, a configuration pop-up will appear on the left. You can choose:
- Track New Button
- Track a URL
Track New Button
This allows you to select any button on the page and assign it to an Event.
Example: Tracking a “Submit Enquiry” button for a Melbourne-based service provider.
Track a URL
This allows you to assign an Event when a user lands on a specific page.
Example: Tracking visits to a product category page for an Australian eCommerce retailer.
Pre-configured events typically include:
- Add to Cart
- Initiate Checkout
- Purchase
- View Content
If you operate an eCommerce store, most checkout-stage events are already configured. Avoid duplicating events, as this can inflate reporting and reduce data accuracy.
Facebook will provide additional event options via a drop-down menu if required.
EXAMPLE 1: Tracking Leads with the Meta Pixel
For many Australian service-based businesses, an enquiry submission is the first step towards securing a client.
Tracking this event allows you to:
- Optimise campaigns for lead generation.
- Build remarketing audiences.
- Create Lookalike Audiences based on high-intent users.
Setup process:
- Navigate to your Contact or Enquiry page.
- Select “Track New Button”.
- Click the “Submit” or “Send Enquiry” button.
- From the drop-down, select either “Contact” or “Lead”.
- Click “Confirm”.
Click “Finish Setup” in the top-right corner to activate tracking.
You can edit, delete, or review event details under the “Events on This Page” tab.
EXAMPLE 2: Tracking Email Subscribers
Users who subscribe to your email list have demonstrated strong interest in your brand.
Tracking this event allows you to:
- Remarket to subscribers.
- Optimise campaigns for newsletter growth.
- Build high-quality prospecting audiences.
Using the Event Setup Tool:
- Select the email sign-up button.
- Assign the “Subscribe” event.
- Confirm and finish setup.
This will track subscription activity across relevant pages.
EXAMPLE 3: Tracking Brand Advocates
Word-of-mouth marketing remains highly influential in Australia. Tracking referral or recommendation actions can help identify loyal customers.
For example, if your website includes a “Recommend to a Friend” feature:
- Select the relevant button.
- Assign the appropriate event.
- Confirm and finish setup.
You can then:
- Retarget advocates.
- Offer referral incentives.
- Encourage loyalty program enrolment.
There are numerous additional event configurations available. It is recommended that you:
- Map your customer journey.
- Identify key conversion points.
- Assign events strategically.
- Avoid unnecessary duplication.
Check if conversions are being tracked properly
This step requires the Meta Pixel Helper Chrome Extension.
Steps:
- Open your website in Google Chrome.
- Perform the tracked action (e.g., submit form, add product to cart).
- Click the Meta Pixel Helper extension.
- Confirm the event appears in the list.
- Review event parameters for accuracy.
If tracking a button click:
- Press and hold Ctrl (or Cmd ⌘ on Mac).
- Click the button to open it in a new tab.
- This prevents page refresh and ensures the event can be observed.
Testing Your Events
In Meta Business Manager:
- Navigate to Events Manager.
- Click “Test Events”.
- Enter your website URL under “Test Browser Events”.
- Click “Open Website”.
Complete the configured actions. Each event should appear in real time within the Test Events panel.
Events created using the Event Setup Tool will display that setup method in the reporting column.
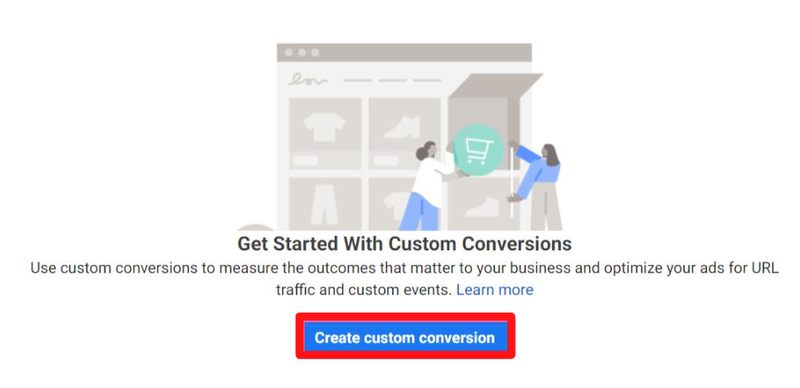
Using Custom Conversions to Track Lead Signups
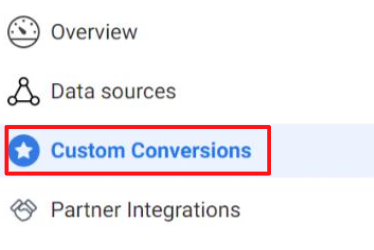
In Events Manager:
- Click “Custom Conversions”.
- Click “Create Custom Conversion”.
Configure the following:
Name
Keep it concise and descriptive (e.g., “Trial Lead – AU”).
Description (optional)
Provide clarification if required.
Conversion Event
Select “Lead” or choose “All URL Traffic” if needed.
Rule Configuration
Select:
- [URL] [contains]
Enter a unique portion of your “Thank You” page URL.
Example:
If your website is: example.com.au
And your confirmation page is:
example.com.au/thank-you-consultation
You may use:
- /thank-you-consultation
Avoid using partial phrases that appear elsewhere on the site.
If necessary:
- Modify the URL slug to make it unique.
- Use [URL] [equals] instead of [contains].
Important considerations:
- Dynamic URL parameters may prevent accurate tracking.
- In such cases, consider implementing Standard Events via Google Tag Manager instead.
Value (optional)
Assign a monetary value to the conversion if applicable. This assists with campaign optimisation and return on ad spend analysis.
Click “Create”.
If the status shows “Inactive”:
- Open the relevant confirmation page in a new tab.
- Wait 30 seconds.
- Refresh the Custom Conversions page.
A green “Active” status confirms correct configuration.
Configuring Conversion Events in Meta Business Manager
After verifying your conversion tracking:
- Configure the events inside Meta Business Manager.
- Follow SOP 098 (web version) for detailed instructions.
Once configured, the conversions will be available for optimisation within your Meta advertising campaigns.